
Universal Analytics (UA) will stop collecting data in July 2023 and accounts are scheduled to be deleted in Jan 2024.
In order make comparisons from year to the next, you’ll want at least 12-months of historical data before July 2023 comes around. You can’t import your UA data into Google Analytics 4, unfortunately. So, if you haven’t done so already, that means creating a GA4 property IMMEDIATELY.
This guide shows exactly how to upgrade to GA4 like a pro.
Contents
- Tracking Blueprint
- Setup Google Analytics 4
- Add GA4 Using Google Tag Manager
- Consent Management Considerations
- Conclusion
- Download the GA4 Migration Checklist
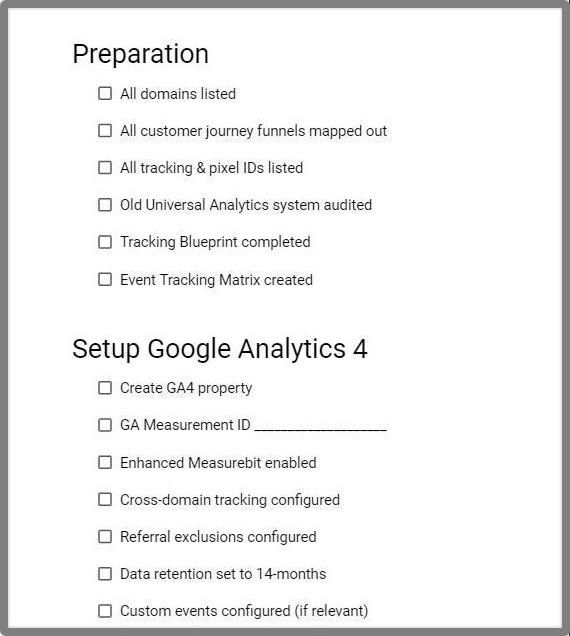
Tracking Blueprint
Imagine building a house.
Unless you want the project to run overtime, cost a fortune and have quality issues, you’ll want to follow a blueprint.
Similarly, when it comes to Analytics, starting with a Tracking Blueprint will pay dividends later.
Creating a Tracking Blueprint involves mapping out your business goals and KPIs, and then deciding which events and parameters you need to measure.
Download the free Tracking Blueprint template here.
Also, study what’s already been done in your Universal Analytics to see to see what data is still relevant.
Setup Google Analytics 4
Create a GA4 Property
Once you have your Tracking Blueprint, it’s time to create a Google Analytics 4 property.
In your Universal Analytics account, click “Admin” button in the bottom left corner of the screen.
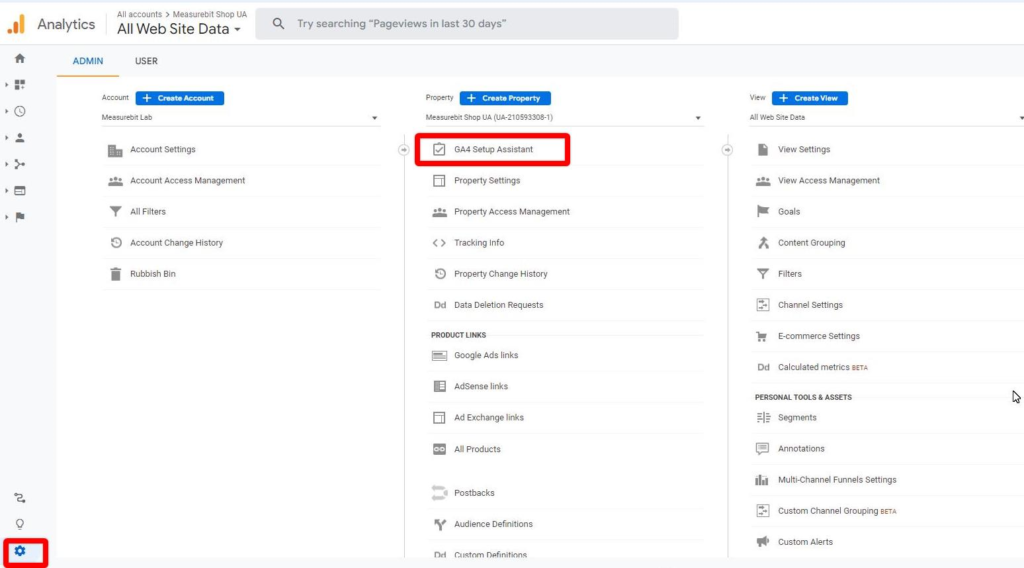
You’ll see a button to create your new GA4 property in “Property” column.
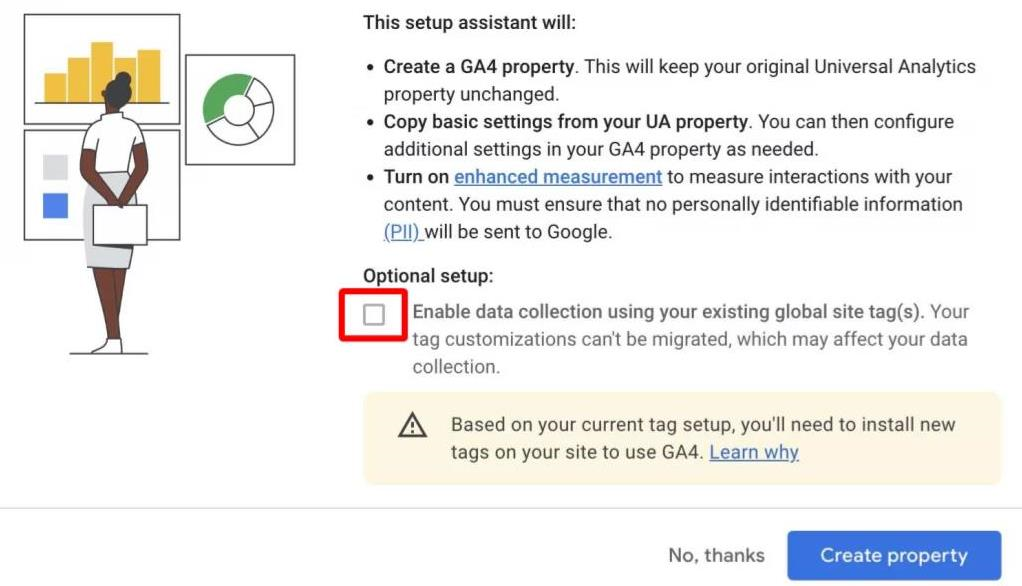
If you click the “Enable data collection using your existing global site tag(s)” checkbox, the system will populate events from the existing Universal Analytics setup. This will limit your ability to setup GA4 correctly. As such, we recommend leaving this box unchecked.
GA Measurement ID
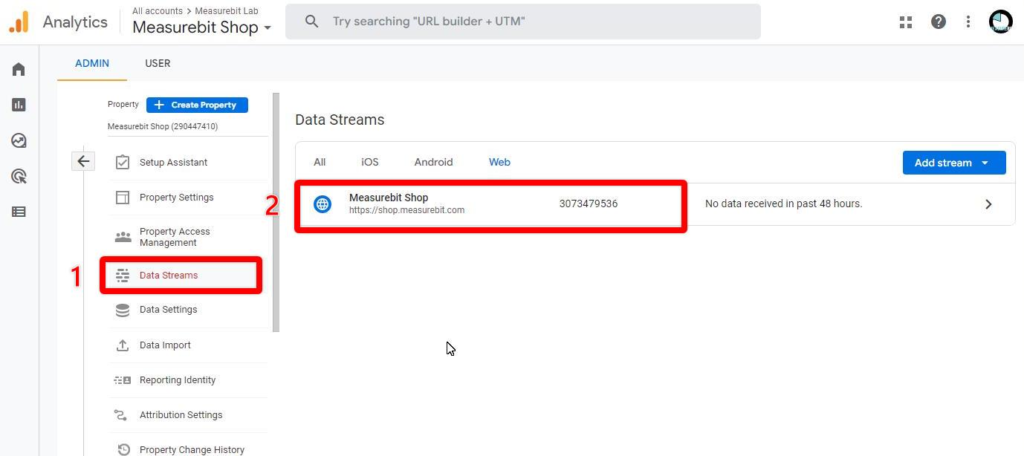
Now, within the new GA4 property:
Go to Data Streams > Stream.
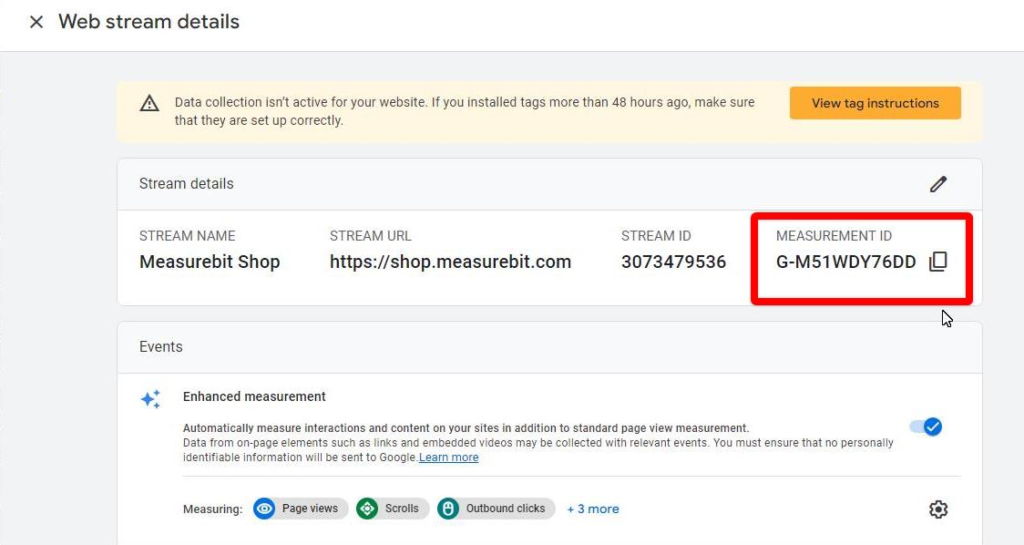
Copy the Measurement ID into a notepad. We’ll be using this later in this process.
With these basic steps completed, let’s look at a few other recommended settings that will greatly improve your analytics.
Enhanced Measurement
In the image above, you’ll notice Enhanced Measurement is enabled by default.
This is a new feature in GA4. It allows you automatically collect data on standard events such as scroll, click, view search results, video progress, and file downloads.
Cross-Domain Tracking
When a prospect visits your site for the first time, GA4 assigns them a unique client_id and stores the value as a 1st-party cookie.
1st-party cookies can be accessed by any subdomains that share the same root domain. Example – cookies created on https://your-site.com can be accessed by https://go.your-site.com.
client_id is extremely important for keeping track of all the activities a prospect does as they browse through your sites and pages.
If the site your prospect navigates to does not share the same root domain, GA4 has no way of accessing the client_id cookie. So, it sets a new one.
As a result, the system thinks the visitor as a different person altogether. It has no memory of what the visitor was doing on the previous site just seconds earlier.
That’s why, to see the customer journey across all of your interconnected sites, you need to setup cross-domain tracking.
Here’s how to do it:
Go to Data Streams > Stream > Configure Tag Settings > Configure your domains.

Add a list of all your root domains (without https) and click “Save”.
Referral Exclusions
When multiple websites link to each other – main website, funnel system, and ecommerce store – they act as a single interconnected system.
Take the example of driving paid traffic to a funnel. At the end of the funnel is a link to your main site.
Normally, any visitors to the main site will look like they were referred by your funnel. Yet, the ad campaign should have received credit for the visit, not the funnel.
Unless Referral Exclusions are configured, you won’t see the original referrer information.
To get your analytics telling the right story, you need to configure Referral Exclusions.
With Universal Analytics, you had to manually configure Referral Exclusions.
With GA4, when you have Cross-Domain Tracking configured, the docs say Referral Exclusion should work too.
However, I like to be doubly sure by doing the following:
Go to Data Streams > Stream > Configure Tag Settings.
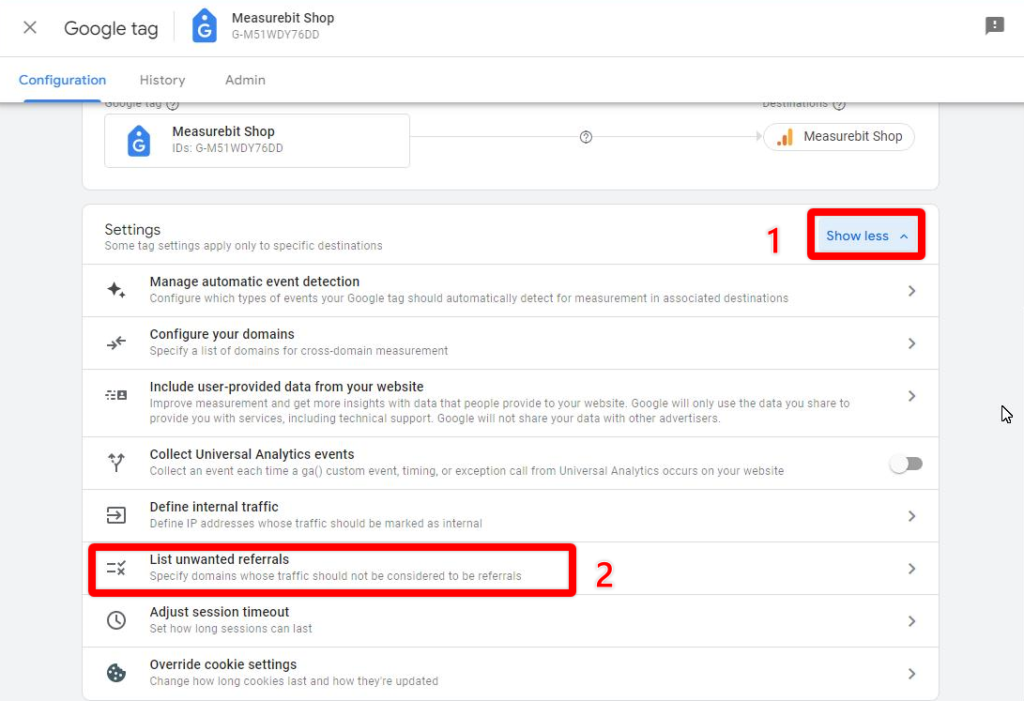
Click the “Show more” button to reveal more options, then click “List unwanted referrals”.
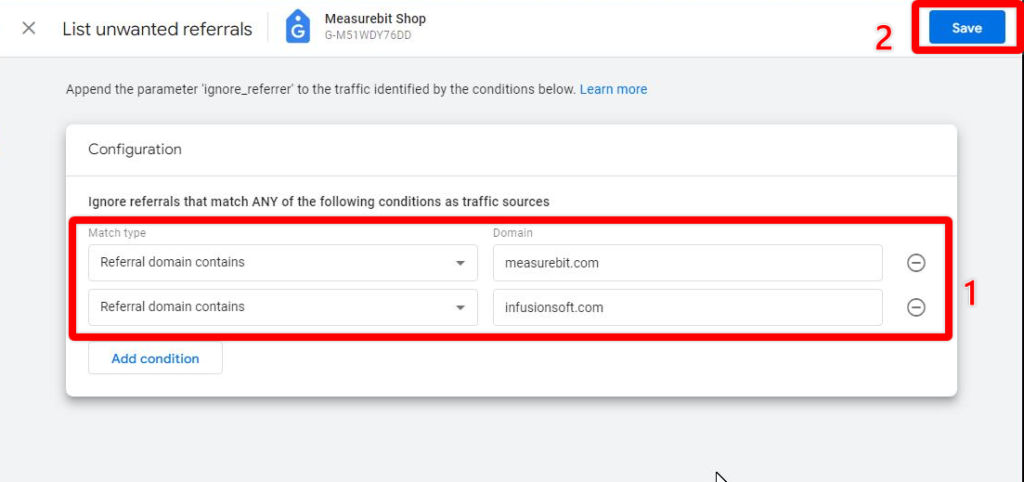
Enter the domains you want to exclude referrals from, then click “Save”.
Now referrals between the listed domains will be ignored, and the actual referral source will be shown in your analytics reports.
Data Retention
By default, GA4’s data retention for events associated with cookies, user IDs or advertising click IDs are set to 2 months.
You can extend this period up to 14 months.

Go to Admin > Data Settings > Data Retention, click the drop down and select “14-months” then hit the “save” button.
Custom Events
If you’re using Google Tag Manager to deploy GA4 (strongly recommended), then you can create a custom event from your website with the following script:
<script>
  dataLayer.push({
    event: "some_custom_event"
  });
</script>
Custom Definitions
When sending parameters along with events to GA4, if they’re not already defined as dimensions, you’ll have to define them before you can access them in reporting. To do so:
Go to Configure > Custom definitions > Custom dimensions and click the “Create custom dimensions” button.
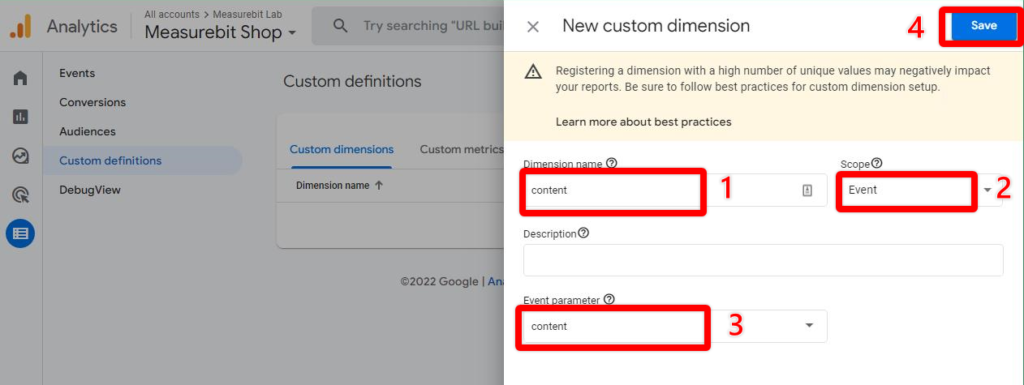
Two dimensions you should define right away is “content” and “term”. These correspond with utm_content and utm_term.
For some odd reason, the Google Analytics 4 team decided to leave these out of the default setup. Lots of people use these dimensions.
The system will need to have collected event data with dimension in order to be able to define it as a custom dimension.
Give the dimension an appropriate name, choose whether the scope is for an Event or for a User, select a parameter (that the system has already seen) from the dropdown and hit “Save”.
Custom Metrics
This is a similar process to custom definitions.
Go to Configure > Custom definitions > Custom metrics and click the “Create custom metrics” button.
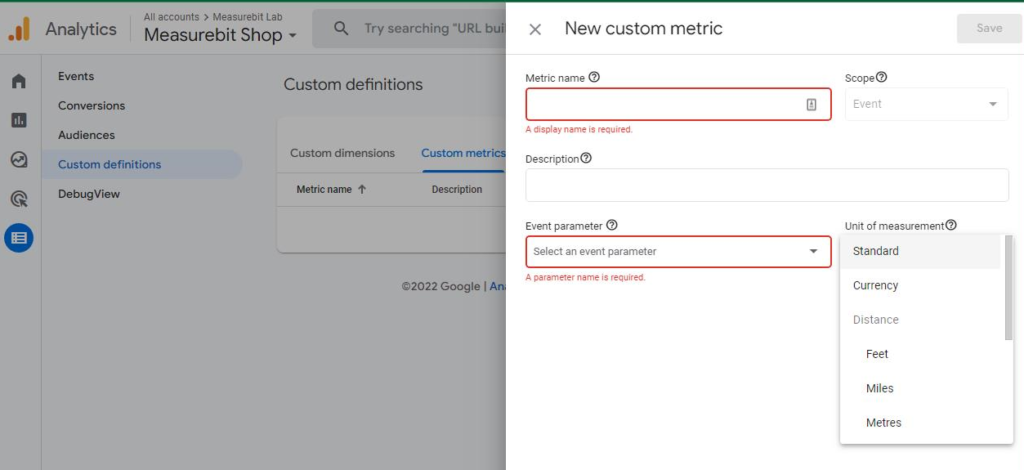
Give the metric a name, choose whether the scope is for an Event or for a User, select a parameter (that the system has already seen) from the dropdown, choose the unit of measure, then hit “Save”.
Conversions
To run queries about specific conversions, you first need to mark certain events as being a conversion.
To do that is simple. Go to Conversions > Events. Then toggle the event as a conversion.
Now the event will show up as a conversion that you query in reporting.
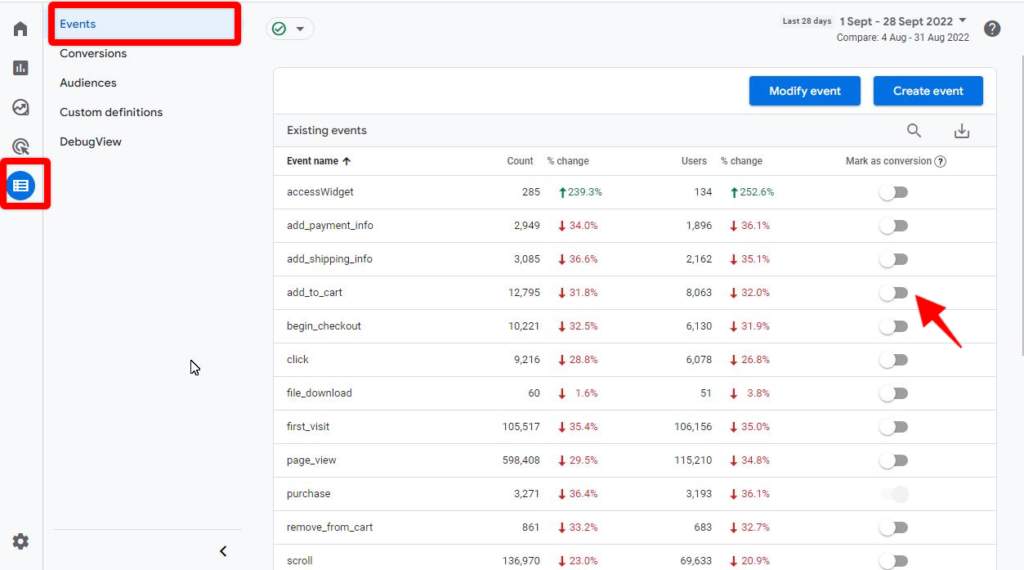
You can define up to 30 conversions with GA4’s free tier.
Google Ads
Linking your Google Ads account allows you to see your ad costs and analyze CPA and ROAS in GA4 (powerful). Plus, you can create audiences from GA4 audiences and optimize for GA4 conversions in Google Ads.
Make sure you’re already logged into your Google Ads account, in a separate tab.
Go to Admin > Property > Google Ads links > Link
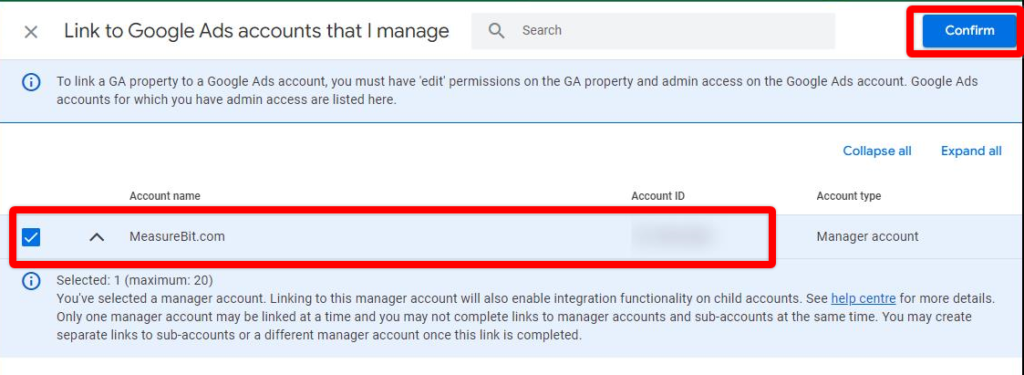
Click “Choose Google Ads accounts”, choose the account you want link, then click Confirm”.
Google Search Console
Linking Google Search Console provides information about the performance of organic-search traffic in GA4.
Make sure you’re already logged into Search Console, in a separate tab.
Go to Admin > Property > Search Console links and click the “Link” button.
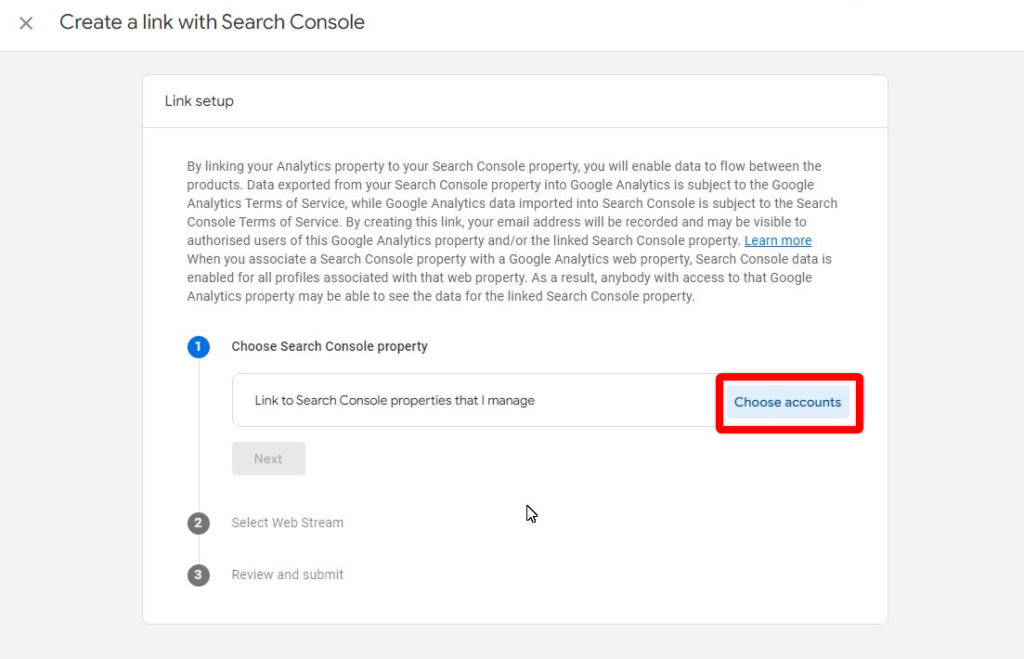
Click “Choose accounts, choose the account to link, and click “Next”, then click “Confirm”.
Google BigQuery
There are some drawbacks to keeping your data in Google Analytics 4:
- GA4 doesn’t allow you to add PII data (personally identifiable information)
- After a maximum of 14 months, some of the data starts disappearing
- You can’t join GA4 data with other data from your CRM, cart, payment processor, etc
- The maximum attribution lookback window is 90-days. So, if the time it takes to convert a visitor is longer than 90-days, you won’t be able to tie the conversion back to the original visit.
Data is oil and owning your own 1st-party data platform is like owning an oil rig.
The cost of running a BigQuery instance is nominal. Most small businesses will be lucky to break $5 per month and the costs for mid-market enterprise are normally modest.
In short, there’s no good reason not to store your data in BigQuery.
To create a BigQuery instance, you first need a Google Cloud Platform (GCP) account. New accounts get $300 free credit to be used over the first 90-days.
Once you’ve created a BigQuery instance, make sure you’re logged into GCP.
Next, go to Admin > Property > BigQuery and click the “Link” button.
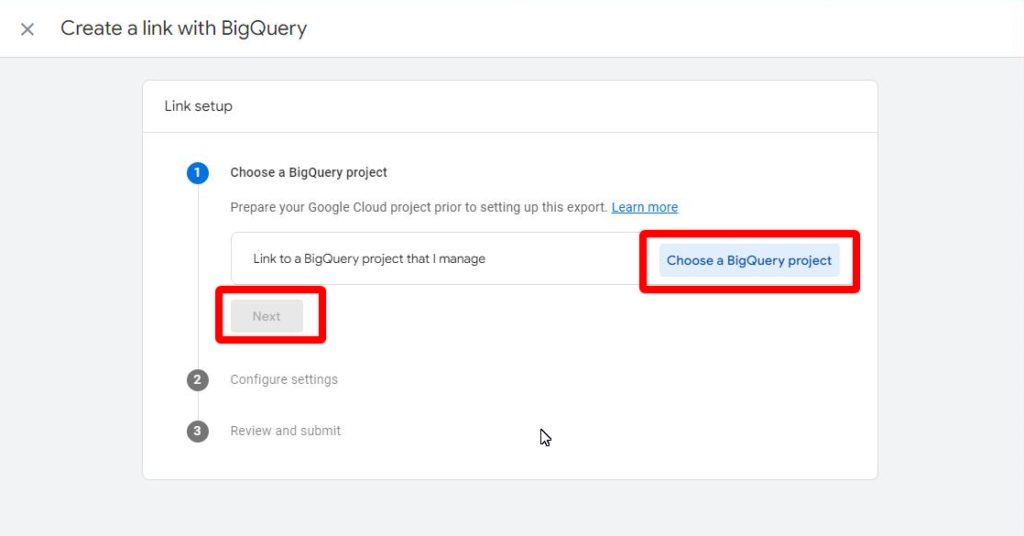
Click “Choose a BigQuery project”, choose the proejct to link, and click “Next”, then click “Confirm”.
Debug Filter
When testing your setup with Google Tag Manager, it usually adds a query string at the end of the URL. For example – https://measurebit.com/?gtm_debug=1664426399801.
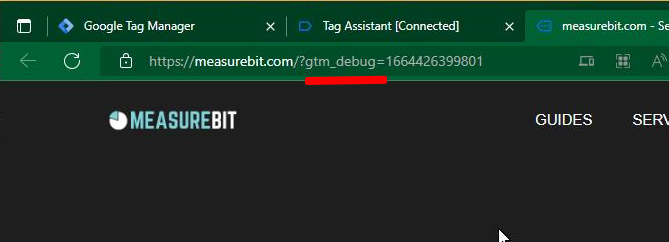
If you want to filter out these visits so they don’t show up in your digital analytics:
Go to Admin > Property > Data Settings > Data Filters > Create Filter
Choose whether you want to filter “Developer Traffic” or “Internal Traffic”.

In this case, we’ll choose “Developer Traffic”, exclude, and filter state “Testing” (to label the hit with a “test” parameter) or active (to exclude the traffic altogether).
Next, click “Create”.
That wraps up the most common GA4 configurations. Now, let’s cover how to deploy GA4 on your website.
Download the free GA4 Migration Guide
Add GA4 Using Google Tag Manager
The best way to add Google Analytics 4 to your site is via Google Tag Manager. It gives you most freedom for collecting all the events and parameters you need while having fine-grained control over where tags fire.
If you’re not already using GTM, make sure you’re logged into gmail, then navigate to tagmanager.google.com and create a free account.
Create a GTM Web Container
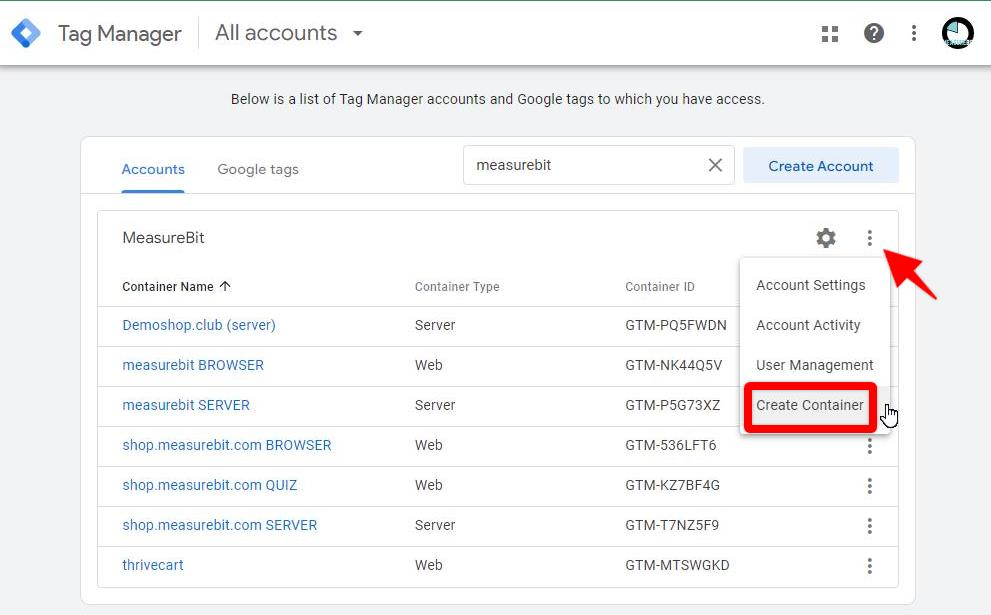
Click the button with 3 little dots near the top right to reveal a dropdown menu, then click “Create Container”.
Best practice is to create both Web and Server containers and link them together for a robust server-side tracking setup. But you can do this in stages and add the server-side tracking at a later date.
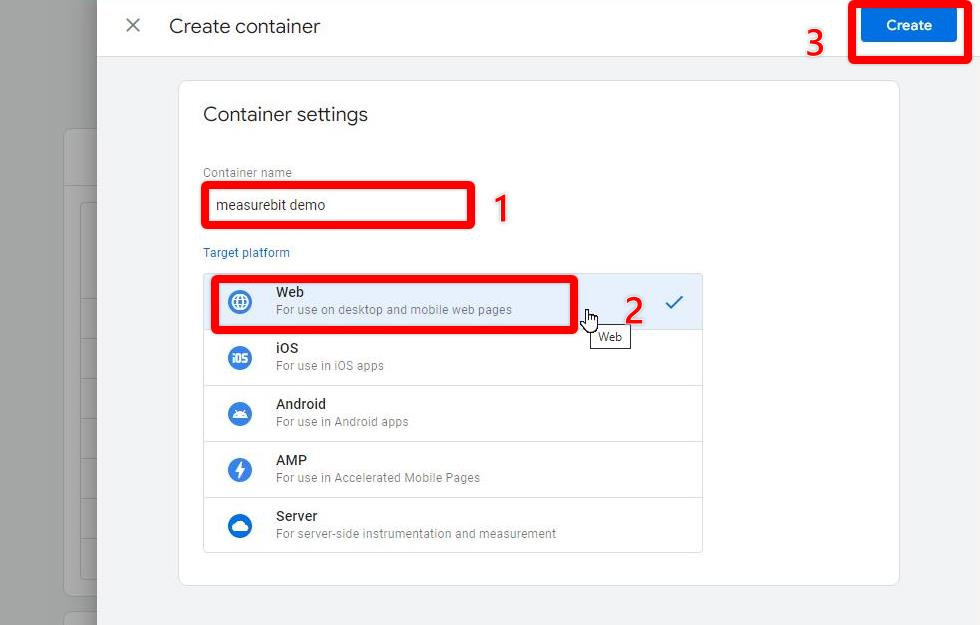
Give your GTM container a name, choose the “Web” option, then click the “Create” button.
GA4 Configuration Tag
You need at least two GA4 tags… one for initial page load and one for any events you’re measuring.
Let’s set up the page load tag first.
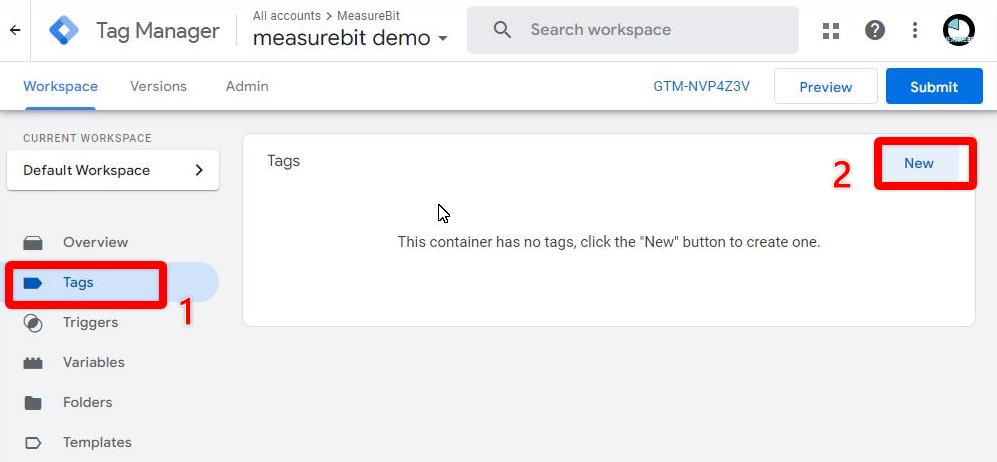
Click “Tags” link.
Click “New” button.
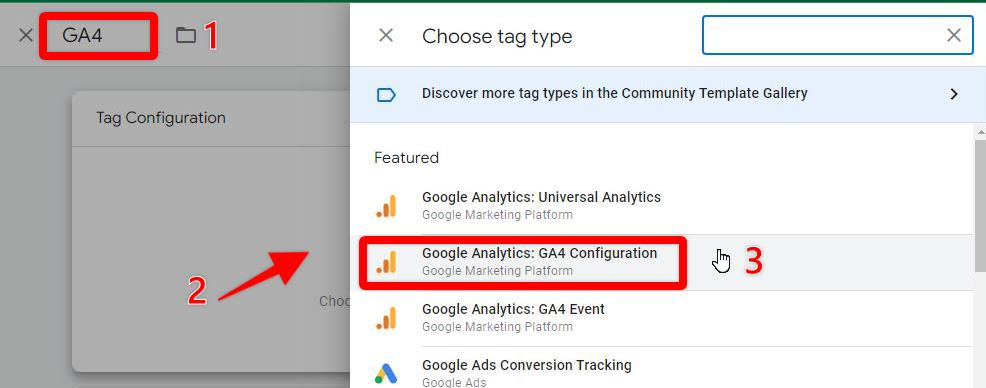
Name the tag (e.g. “GA4”).
Click “Choose a tag type to begin setup…” link.
Choose “Google Analytics: GA4 Configuration” from the menu options.
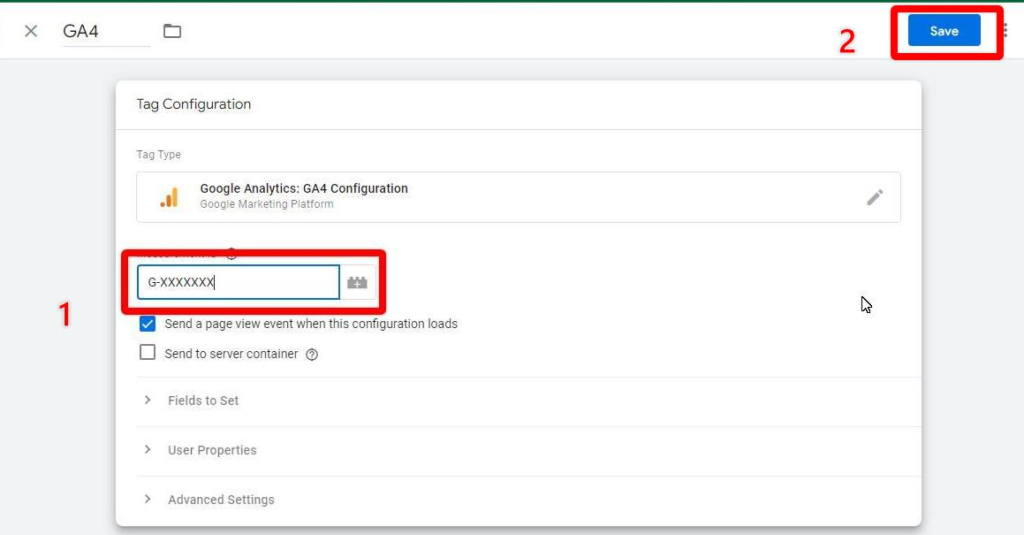
Enter the GA4 Measurement ID into the box provided.
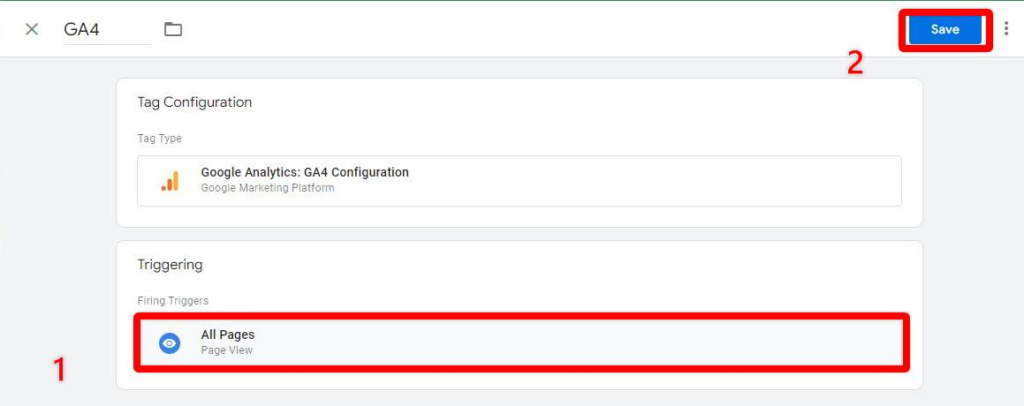
Click “Triggering” section and select “All Pages” option.
Then click “Save” button to save the tag setup.
The Data Layer
Next, we need another tag to send data to GA4 whenever something meaningful happens on a web page.
We’ll come back to creating this tag in just a moment. But first we have to create some kind of trigger to tell the tag to fire.
You can trigger tags upon just anything in GTM.
Wherever possible, we try to trigger tags with events rather than page views.
Why events?
An event can be clicking a link or button… scrolling down the page… browsing a page for longer than 30 seconds… filling out a form… making a purchase… basically, any meaningful interaction you can think of.
The advantage of using events is you can access a BUNCH of useful data to send to analytics, Google Ads, Facebook Ads, a database, or pretty much anywhere you choose.
The way to push data from your website is using what’s known as a dataLayer push.
Here’s a simple example of a script used to push data to GTM whenever a product detail page is viewed on an ecommerce site:
<script>
dataLayer.push({
  event: "generate_lead",
  conversion: {
    firstname: "John",
    lastname: "Doe",
    email: "[email protected]",
    phone: "+1-234-56789",
    value: 10,
    currency: "USD"
  }
});
</script>
This script creates an event named “generate_lead” and sends parameters such as name, email, phone, value, and currency along with the event. The amount of data you send depends on what you’re using it for.
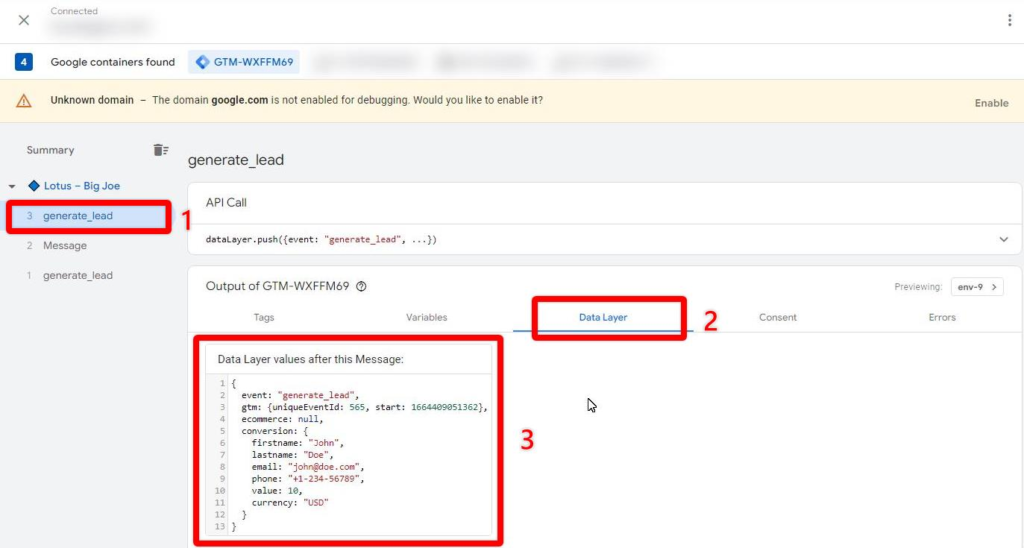
In GTM preview mode, events appear in the left sidebar.
You can see the data that’s pushed into the dataLayer along with the event by clicking the “Data Layer” tab.
(Learn more about Google Tag Manager’s dataLayer, here.)
Create a Trigger
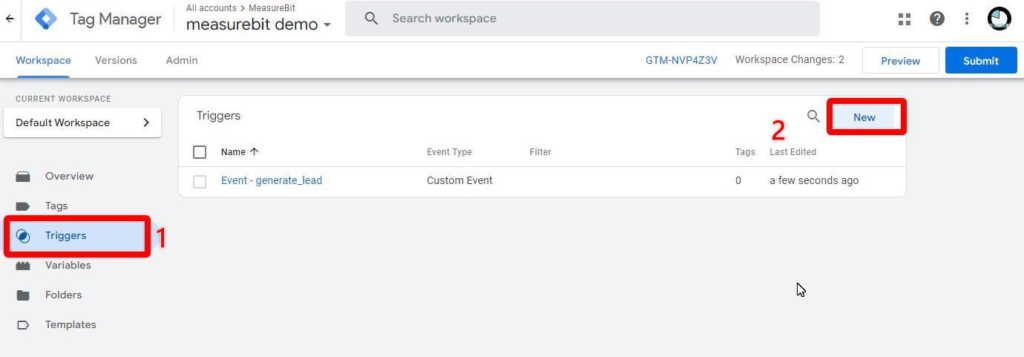
Navigate to the “Triggers” tab in the lefthand sidebar.
Click “New” to create a new trigger.
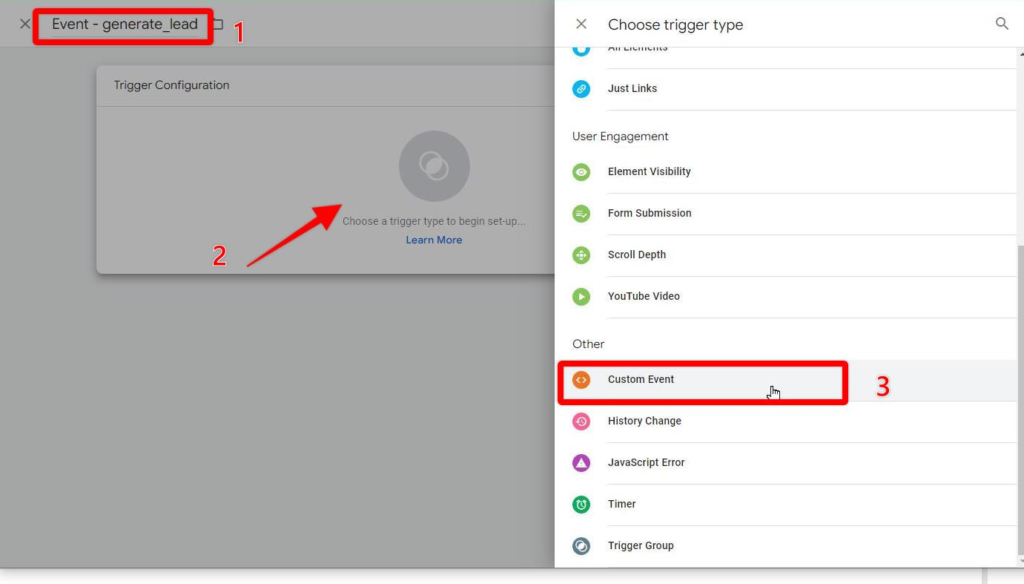
Give the event an appropriate name (e.g. Event – generate_lead), then click “Choose a trigger type to begin setup …”
Choose “Custom Event” from the menu options.
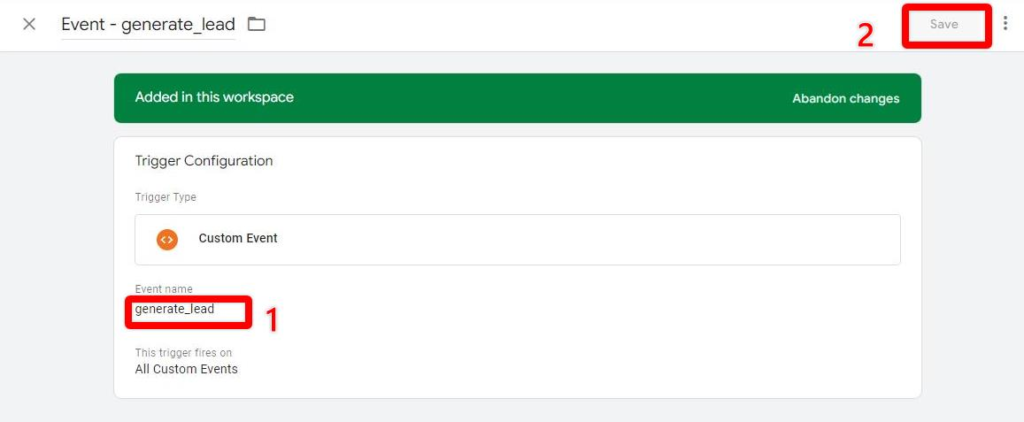
If we want this trigger to pick up the dataLayer.push example from earlier, we’d enter “generate_lead” for the event name.
Click “Save” button to save the new trigger.
GA4 Event Tag
Once again, we’ll create a new tag.
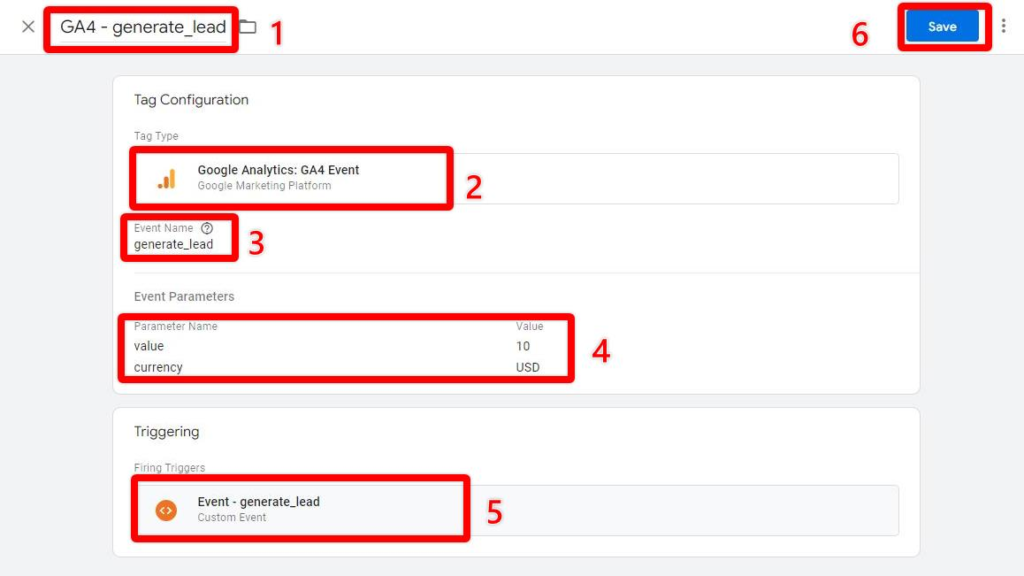
Give your tag a name (e.g. GA4 – generate_lead), choose “Google Analytics: GA4 Event” as the event type, enter the event name, parameters (if you’re passing this data to GA4), and the trigger that the tag is to fire upon.
Note – for privacy policy reasons, you can’t send PII (personally identifiable info) to Google Analytics.
Content Grouping
I often see Analytics setups where businesses use one analytics property or view for each and every domain.
The normally do this so they can view the traffic and conversions for each domain, separately.
But if those domains send traffic to each other, then the data should really be in the same property. That way, you’ll be able to see the entire customer journey across multiple sites.
GA4’s solution to this conundrum is to use Content Grouping.
Content groups enable you to categorize pages and screens into custom buckets so you can see metrics for related groups of information.
I’m not going to go into detail on how to it in this article. Here’s a GA4 knowledgebase article about Content Grouping in GA4.
Just realize it’s possible but requires some setup in Google Tag Manager.
Download the free GA4 Migration Guide
Consent Management Considerations
So far, the focus of this article has been on moving from UA to GA4 and deploying using GTM.
However, ‘consent management’ is an area that’s growing increasingly important… most certainly if you do business in the European Union or California.
Where you store your data and what you do with it is becoming important.
We haven’t seen much in the way of court cases yet. But you can be sure that the powers that be are just itching to make examples of a few notable businesses.
Luckily, Google Tag Manager has built-in support for consent management. You can toggle tags to only fire if consent is given. That leads onto my next point…
How do you manage consent?
If you read the GDPR and CCPA fineprint, you’ll learn that simply firing a consent popup on your website is no-longer enough.
There are a number of established Consent Management Platforms who specialize in this area. Here are a few that I’ve stumbled upon during my data journeys:
- CookieYes
- Secure Privacy
- illow
- DataGrail
- Securiti
- Ketch
- Ethyca
Do your own research to see if a particular service properly satisfies the legel requirements in your jurisdiction.
Conclusion
With Universal Analytics going away in 9-months, now’s the time to migrate Google Analytics 4 properly.
Doing so will yield clarity about what’s working and what’s not in your digital marketing.
If want help setting up tracking for specific systems such as Shopify, Woocommerce, Samcart, Infusionsoft, Clickfunnels, Magento, Thrivecart, Bigcommerce, Squarespace, Typeform, Jotforms, Gravity Forms, Leadshook…
Or you want to see your ad costs, CRM data, revenue, and data from Stripe, NMI, Recurly together in GA4 so you can see accurate CPA, ROAS, and LTV for your marketing… we’ve got ton of experience with this.
You can schedule a free 20-minute call to discuss your project here
Download the GA4 Migration Checklist

0 comments